Create an in-transit warehouse transfer
Related information
With an in-transit warehouse transfer, you can accommodate for the time it takes to move or ship inventory between warehouses. While the inventory is being shipped, it's categorized as being in transit and is not considered to be on hand at either the source warehouse (the from warehouse) or the destination warehouse (the to warehouse).
| Subscription | Inventory Control |
|---|---|
| User type | Business, Warehouse |
| Permissions | Warehouse transfer: List, Add, Edit |
| Prerequisites | Inventory Control is configured for in-transit warehouse transfers. |
An in-transit warehouse transfer is a multi-step process:
- Add a warehouse transfer and transfer the inventory out of the From warehouse.
- Transfer the inventory into the To warehouse when it's received.
1. Add a warehouse transfer and transfer inventory out
- Go to Inventory Control > All and select Add (circle) next to Warehouse transfers.
The Warehouse transfer page displays.
For a description of every field on the Warehouse transfer page, see field descriptions.
- Select In transit for the Transfer type.
- Enter a Date.
The date is used as the transaction date for the warehouse transfer record.
- Use the From warehouse dropdown list to select the warehouse you want to transfer the items from.
- Use the To warehouse dropdown list to select the warehouse you want to transfer the items to.
- If you are transferring items between warehouses in two different entities that use different base currencies, review the exchange rate information and change as needed.
- Enter the Estimated transfer out date.
This is the date you expect the transferred inventory to be shipped out of the from warehouse. The date is used as the transaction date for the underlying transfer-out and in-transit transactions that are automatically generated.
- Enter the Estimated transfer in date.
This is the date you expect the transferred inventory is to be received at the to warehouse. The date is used as the transaction date for the underlying transfer-in transaction that is automatically generated.
- In the Entries section, add a least one line item.
Non-inventoried items cannot be transferred.
Details for items with FIFO/LIFO cost methodYou cannot select the Unit and the costs aren't displayed until you save the transaction. When you go back and edit or view the warehouse transfer, you'll see the extended cost. When the underlying transfer-out and transfer-in transactions are automatically created, these transactions include one or more lines for the item to show the quantity and costs at each cost layer.
Details for items with trackingIf the item is bin, serial, lot, or expiration tracked (or any combination of those), complete the following steps:
- Open the Details area for the line item.
- Use the table in the details area to select the tracking information and specify the Quantity to transfer.
- Ensure the total quantity to transfer matches the value for Quantity multiplied by unit above the table.
For example, assume you want to transfer 100 units of a bin-tracked item, and those units are in two different bins in the from warehouse. The From bin dropdown menu displays only the bins in which the item is located, and the the Quantity available column shows the number of units that can be transferred from each bin.
The To bin dropdown menu displays the bins at the to warehouse into which the units can moved. If the item is already in any bins, the quantity that's present is indicated. This helps you decide which bins to move the quantity to.
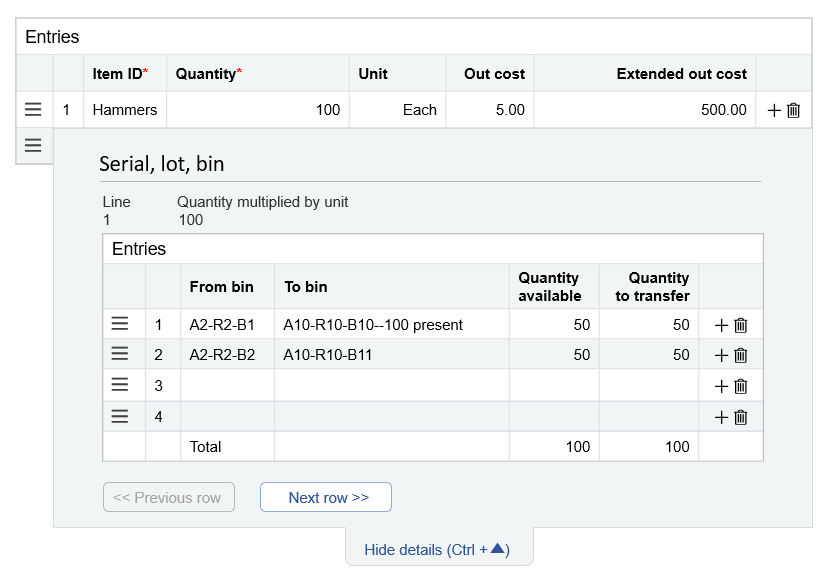
In the above example, the 100 hammers will be moved from 2 bins at the from warehouse, each of which has 50 hammers. The bins at the to warehouse can hold up to 150 hammers. So, 50 hammers will be moved into a bin that already contains 100 hammers. The other 50 hammers will be moved into another bin that is empty.
- Print a pick list.Details
- Select Draft.
- In the Warehouse transfers list, find your saved transfer record.
Select Edit at the end of the row.
- On the Warehouse transfer page, select More actions > Print to and select View and Download as a PDF file.
- Give the pick list to the warehouse worker to pull inventory the from warehouse.
- When the inventory has been picked and shipped, select Transfer out in the warehouse transfer record.Details
- In the Warehouse transfers list, find your draft transfer record.
Select Edit at the end of the row.
- On the Warehouse transfer page, select Transfer out.
Sage Intacct automatically creates the system-generated transactions that removes the inventory from being ONHAND at the from warehouse and adds them to being INTRANSIT at the to warehouse.
System-generated transaction definitions Transaction Explanation State Transfer out
Decreases the ONHAND quantities at the from warehouse.
Converted
In transit
Increases the INTRANSIT quantities, which are tracked at the to warehouse.
In Progress
Transfer in
Increases the ONHAND quantities at the to warehouse.
Draft
- Go to Inventory Control > All and select Add (circle) next to Warehouse transfers.
The Warehouse transfer page displays.
For a description of every field on the Warehouse transfer page, see field descriptions.
- Select In transit for the Transfer type.
- Enter a Date.
The date is used as the transaction date for the warehouse transfer record.
- Use the From warehouse dropdown list to select the warehouse you want to transfer the items from.
- Use the To warehouse dropdown list to select the warehouse you want to transfer the items to.
- If you are transferring items between warehouses in two different entities that use different base currencies, review the exchange rate information and change as needed.
- Enter the Estimated transfer out date.
This is the date you expect the transferred inventory to be shipped out of the from warehouse. The date is used as the transaction date for the underlying transfer-out and in-transit transactions that are automatically generated.
- Enter the Estimated transfer in date.
This is the date you expect the transferred inventory is to be received at the to warehouse. The date is used as the transaction date for the underlying transfer-in transaction that is automatically generated.
- In the Entries section, add a least one line item.
Non-inventoried items cannot be transferred.
Details for items with FIFO/LIFO cost methodYou cannot select the Unit and the costs aren't displayed until you save the transaction. When you go back and edit or view the warehouse transfer, you'll see the extended cost. When the underlying transfer-out and transfer-in transactions are automatically created, these transactions include one or more lines for the item to show the quantity and costs at each cost layer.
Details for items with trackingIf the item is bin, serial, lot, or expiration tracked (or any combination of those), complete the following steps:
- Open the Details area for the line item.
- Use the table in the details area to select the tracking information and specify the Quantity to transfer.
- Ensure the total quantity to transfer matches the value for Quantity multiplied by unit above the table.
For example, assume you want to transfer 100 units of a bin-tracked item, and those units are in two different bins in the from warehouse. The From bin dropdown menu displays only the bins in which the item is located, and the the Quantity available column shows the number of units that can be transferred from each bin.
The To bin dropdown menu displays the bins at the to warehouse into which the units can moved. If the item is already in any bins, the quantity that's present is indicated. This helps you decide which bins to move the quantity to.
In the above example, the 100 hammers will be moved from 2 bins at the from warehouse, each of which has 50 hammers. The bins at the to warehouse can hold up to 150 hammers. So, 50 hammers will be moved into a bin that already contains 100 hammers. The other 50 hammers will be moved into another bin that is empty.
-
Print a pick list
Details- Select Draft.
- In the Warehouse transfers list, select Edit next to the warehouse transfer record that was created when you saved the transaction.
- On the Warehouse transfer page, select More actions > Print to and select View and Download as a PDF file.
- Give the pick list to the warehouse worker to pull inventory the from warehouse.
- When the inventory has been picked and shipped, select Transfer out in the warehouse transfer record.Details
- In the Warehouse transfers list, select Edit next to the warehouse transfer record that was created when you saved the transaction.
- On the Warehouse transfer page, select Transfer out.
Sage Intacct automatically creates the system-generated transactions that removes the inventory from being ONHAND at the from warehouse and adds them to being INTRANSIT at the to warehouse.
System-generated transaction definitions Transaction Explanation State Transfer out
Decreases the ONHAND quantities at the from warehouse.
Converted
In transit
Increases the INTRANSIT quantities, which are tracked at the to warehouse.
In Progress
Transfer in
Increases the ONHAND quantities at the to warehouse.
Draft
2. Transfer the inventory into the destination warehouse
When the inventory is received at the To warehouse, you are ready to update the warehouse transfer to transfer in the inventory:
- Go to Inventory Control > All > Warehouse transfers.
- In the Warehouse transfers list, find your transfer record.
-
Select Edit at the end of the row.
- Change the Estimated transfer in date if it's different than the date that you’re actually transferring in the inventory.
- Select Transfer in.
The Warehouse transfers list appears, and the state of the transaction is now Posted. The three system-generated inventory control transactions are automatically deleted and re-created. The ONHAND quantities are increased at the to warehouse.
System-generated transaction definitions Transaction Explanation State Transfer out
Decreases the ONHAND quantities at the from warehouse.
Converted
In transit
Increases the INTRANSIT quantities, which are tracked at the to warehouse.
Converted
Transfer in
Increases the ONHAND quantities at the to warehouse.
Closed
The INTRANSIT quantities are automatically decreased.
- If you transferred standard cost items that have different costs at the from and to warehouses, create manual journal entries to move the difference in value from your clearing accounts to your variance account.
- Go to Inventory Control >All> Warehouse transfers.
- Select Edit next to the warehouse transfer that you used to transfer out the inventory.
- Change the Estimated transfer in date if it's different than the date that you’re actually transferring in the inventory.
- Select Transfer in.
The Warehouse transfers list appears, and the state of the transaction is now Posted. The three system-generated inventory control transactions are automatically deleted and re-created. The ONHAND quantities are increased at the to warehouse.
System-generated transaction definitions Transaction Explanation State Transfer out
Decreases the ONHAND quantities at the from warehouse.
Converted
In transit
Increases the INTRANSIT quantities, which are tracked at the to warehouse.
Converted
Transfer in
Increases the ONHAND quantities at the to warehouse.
Closed
The INTRANSIT quantities are automatically decreased.
- If you transferred standard cost items that have different costs at the from and to warehouses, create manual journal entries to move the difference in value from your clearing accounts to your variance account.